You're a SkyKeeper.
Your telescope just joined a planet-scaled network.
Plug in your SkyBridge and your telescope becomes a node in a global network - mapping the sky around the clock, contributing to real science, and earning you rewards while you sleep.
You're joining a large, active network - SkyKeeper telescopes on sky around the world, around the clock.
Three things to keep in mind
You don't have to be an astronomer. By keeping your telescope online and available, you become essential infrastructure for a shared, verifiable view of the sky.
Your telescope is an important node in the network
When your scope is online, it joins the shared pool, so the network can point it at targets - even while you sleep or travel.
The SkyQ does the work
SkyMapper's automated brain, the SkyQ, schedules observations - satellites, comets, transients, planetary defense. You don't lift a finger.
You earn & co-author
Every verified observation earns SkyPoints and can credit you as a contributor to real discoveries across the network.
From your backyard to the network
The SkyBridge is a small device that sits near your telescope - indoors is fine, as long as it stays within your telescope's Wi-Fi range (typically up to 60 feet). It links your scope to SkyMapper over your home Wi-Fi - turning a personal instrument into a trusted, always-on node.
Your telescope
Your existing scope - no astronomy expertise needed.
SkyBridge
Plugs in once, runs on its own over Wi-Fi, 24/7.
SkyMapper network
The SkyQ points scopes at real science targets.
Verified data & rewards
Every observation is blockchain-verified. You earn SkyPoints for it.
What joining implies: keep your SkyBridge powered and online as much as you can. The more your scope is available, the more the network can do - and the more you earn. There's no cost to participate beyond the device and your power/internet.
Three resources for every SkyKeeper
Join the community, keep support one click away, and know how to reach us. Keep these handy - then set up your SkyBridge below.
Join the SkyKeepers group
Meet other operators, get help, and watch live detections roll in on Telegram. Access is invite-based - request yours and we'll add you as your SkyBridge comes online.
Submit a support ticket
Report an issue or ask a question through the SkyMapper support portal.
Stay in touch
Questions before you start? Reach the SkyMapper team directly.
Nine steps to first light
Follow these instructions once with a computer nearby. After setup, the SkyBridge runs on its own - you won't need the computer again. Stuck on any step? Open a support ticket and we'll help.
- 1
Plug in the power
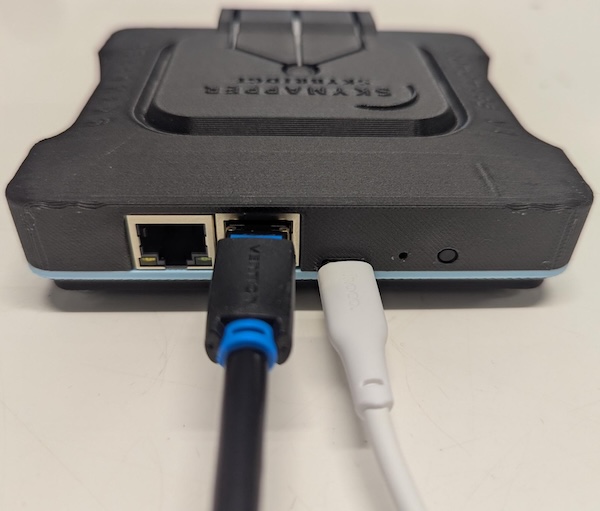
Take the power cable from the box. Plug the small oval
USB-Cend into the oval power port on your SkyBridge (the third opening from the left), then plug the other end into a wall outlet. After about 20 seconds, the small lights on the front start to blink - that means it's powering on.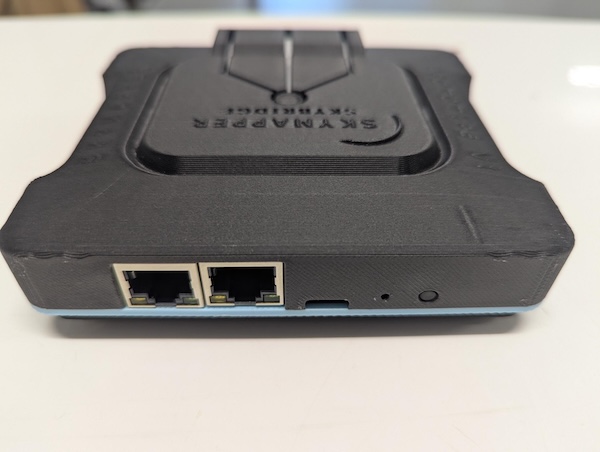
- 2
Connect a cable to your computer
Take an Ethernet cable (the wide, flat internet cable). Plug one end into Ethernet Port 2 on your SkyBridge - that's the network port closest to the power cable - and plug the other end into your computer or laptop. When a small green light appears next to that port, your computer is connected.
- 3
Open the setup page
On your computer, open a web browser (Chrome, Safari, or any other). Click the address bar at the top, type
192.168.5.1and press Enter - this opens the SkyBridge setup page. Click theLog inbutton, typerootin theUsernamebox, and leave thePasswordbox empty. ClickLog inagain to open the dashboard.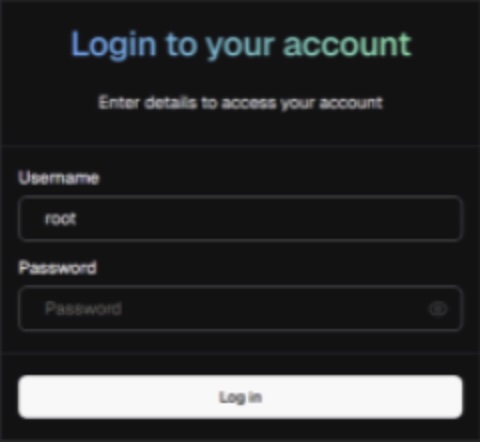
- 4
Give your SkyBridge a name
Still in the dashboard, click the
Systemmenu at the top, then clickSystemin the list that drops down. Click theHostnamebox and type a name you'll recognize - this is how your SkyBridge shows up on the network. Then clickSave & Applyin the bottom right-hand corner. The new name can take a while to show up - that's normal. No need to wait; carry on to the next step.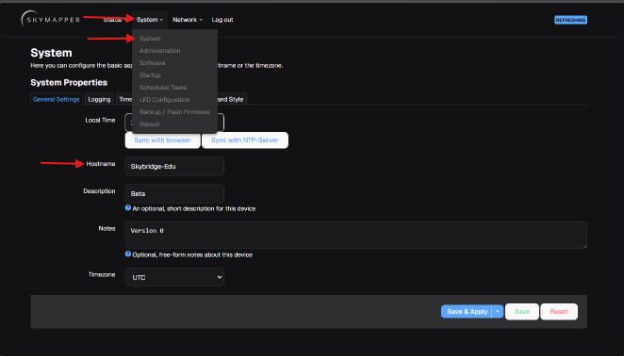
- 5
Find the wireless settings
At the top of the dashboard, click the
Networkmenu, then clickWirelessin the list that drops down. In theWireless Overviewlist, find your telescope's connection and click itsEditbutton. Look for your telescope's Wi-Fi name (its SSID) - you'll need it in the next step.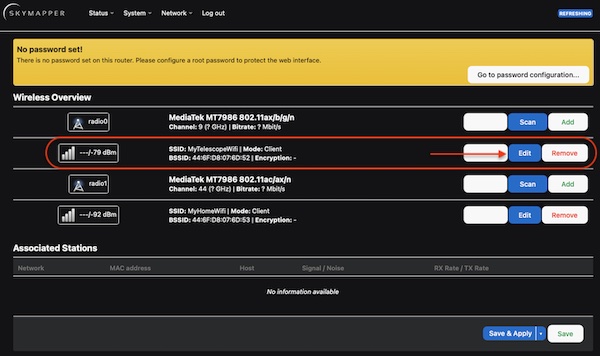
- 6
Enter your telescope's Wi-Fi
This screen connects your telescope. Click inside the
ESSIDbox and type the exact name of your telescope's Wi-Fi network - the same name its app uses. If your telescope's Wi-Fi has a password: click theWireless Securitytab, open theEncryptiondropdown and chooseWPA2-PSK (high security), then click theKeybox and type the telescope's password. When you're done, click theSavebutton, then clickSave & Apply. The SkyBridge will now connect to your telescope.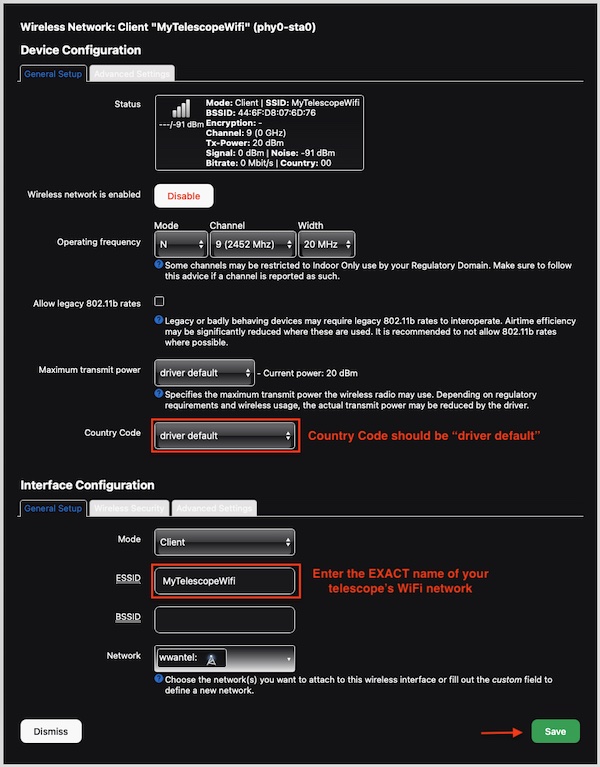
- 7
Have your home Wi-Fi ready
Now you'll connect the SkyBridge to your home internet. Have your home Wi-Fi name and password ready. In the
Wireless Overviewlist, find your home Wi-Fi connection and click itsEditbutton. Tip: use your5.0 GHznetwork - that's the band the SkyBridge should connect to.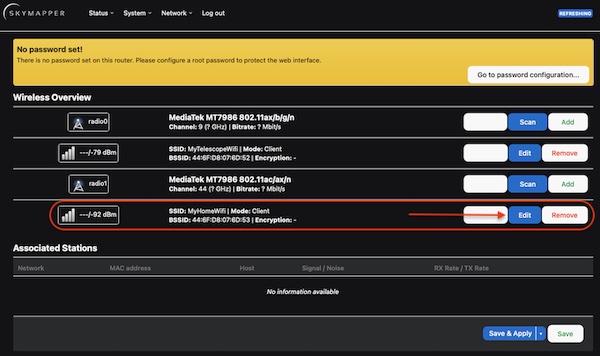
- 8
Connect to your home Wi-Fi
In the
ESSIDbox, type your home Wi-Fi network name exactly. Click theWireless Securitytab, then click theKeybox and type your home Wi-Fi password. Click theSavebutton, then clickSave & Apply. After a few seconds, the SkyBridge connects to your home network.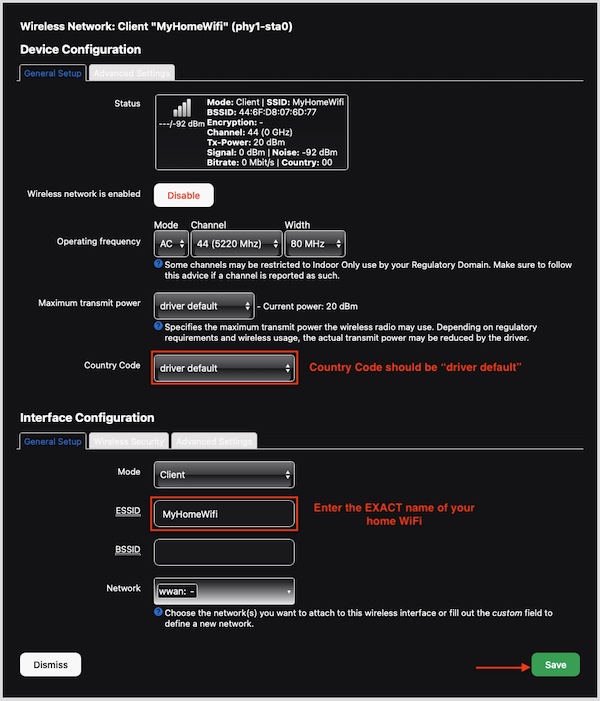
- 9
Confirm the connection to SkyMapper
This last step checks the SkyBridge's secure connection (its VPN) to SkyMapper. At the top, click
Network, thenInterfaces. Find thewg0interface (its protocol readsWireGuard VPN) and look at itsRXvalue - that's data being received, and it should be greater than 0. IfRXshows 0, click theRestartbutton next to it, wait a few seconds, then check again -RXshould now be above 0. That means you're fully connected.
What happens next - you can unplug your computer
The computer is only needed during setup. Once you're connected, keep the SkyBridge plugged in near your telescope - it runs automatically over Wi-Fi, 24/7. You only repeat this setup if you change your Wi-Fi network.
See yourself on the map
Once your SkyBridge is online, you appear as a live dot on the SkyMapper network. Do this quick check before your first observation.

- Open the network map and find your dot - it's where your telescope lives. Hover over a dot to see which telescope it is and confirm it's yours.
- Check the location is right. The SkyBridge finds its position by GPS, and that can take a while - especially indoors or in a basement. Until it locks on, your dot can sit at coordinates 0,0 and no observation will be possible. If your spot looks wrong, give it time or move the SkyBridge closer to a window or the sky.
- Green means go. Once your dot shows green in the right place, create your SkyViewer account and run your first observation below.
Create your SkyViewer account
SkyViewer is the web app where you run observations and explore the network. Setting up your SkyBridge connects your telescope to SkyMapper; creating a free SkyViewer account is how you sign in and start observing. It takes about a minute.
- Open app.skymapper.io and create your free account with an email and password - no crypto wallet needed.
- Confirm your email. We'll send a confirmation link - click it to activate your account. If it doesn't arrive within a few minutes, check your spam folder.
- Sign in and you're ready. Head to your first observation below to connect your telescope and capture the sky.
A first observation with your telescope
Here's the whole flow from login to your first image, in 90 seconds: open SkyViewer, connect to your telescope, pick a target from the catalogue, and watch the photons roll in. It doubles as your end-to-end check - if your images come in, your whole setup works. The waiting parts are sped up; a real observation takes a few minutes.
Log in → connect to your scope → choose a target from the catalogue → point to target → start observing. Your images land in your gallery automatically.
Prefer written steps? Download the guide: How to Create an Astrophoto in 10 Minutes (PDF).
Rewards that add up while you sleep
Two simple ideas: SkyPoints are what you earn for keeping your scope online and contributing. SkyCredits are what you spend on observing time - the Observatory plan, included with your SkyBridge, grants you 125 every billing cycle.
- The Observatory plan, included - serious telescope access and priority support, with 125 SkyCredits granted every billing cycle.
- Earn for uptime - SkyPoints accrue just for keeping your scope online and available.
- Earn for observations - every verified capture the SkyQ runs on your scope pays out SkyPoints.
- Co-authorship option - get credited as a contributor on the science campaigns your scope supports.
Soon: you'll be able to convert your SkyPoints into SkyCredits - turning time on sky into more observing time.